Manage User Roles
The User Role module lets you group and assign permissions (also called passports) to system users based on their specific role in the organization. This helps ensure that each user only gets access to the features they need.
Required Permission
-
Add User Role - Allows the user to create new system roles and assign the appropriate passports (permissions) to them. This permission is also required to use the Copy Role from User feature (duplicate a role setup from an existing user) and the View Users per Permissions feature (see which users have specific permissions).
-
Delete User Role - Allows the user to remove existing system roles from the list. A role can only be deleted if no users are currently assigned to it.
-
Edit User Role - Allows the user to update an existing system role’s details, including its name, description, and assigned passports (permissions).
-
View User Role - Allows the user to access and view the list of existing system roles along with their details, assigned passports (permissions), and the number of users assigned to each role. This permission also enables the View Matrix feature within the module.
How to Access the Module
To access the module, make sure you have the View User Role permission. If it doesn’t appear in your portal, request access from your System Administrator.
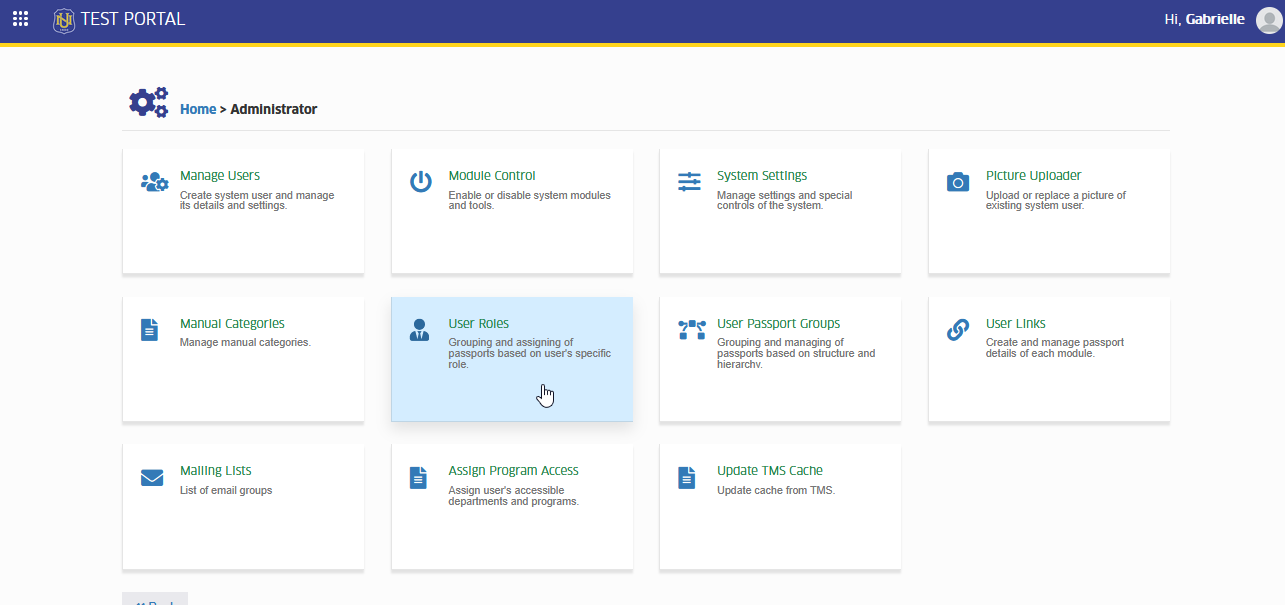
Go to Administrator > User Roles. Click the module tab to redirect to User Roles page.
Field Description
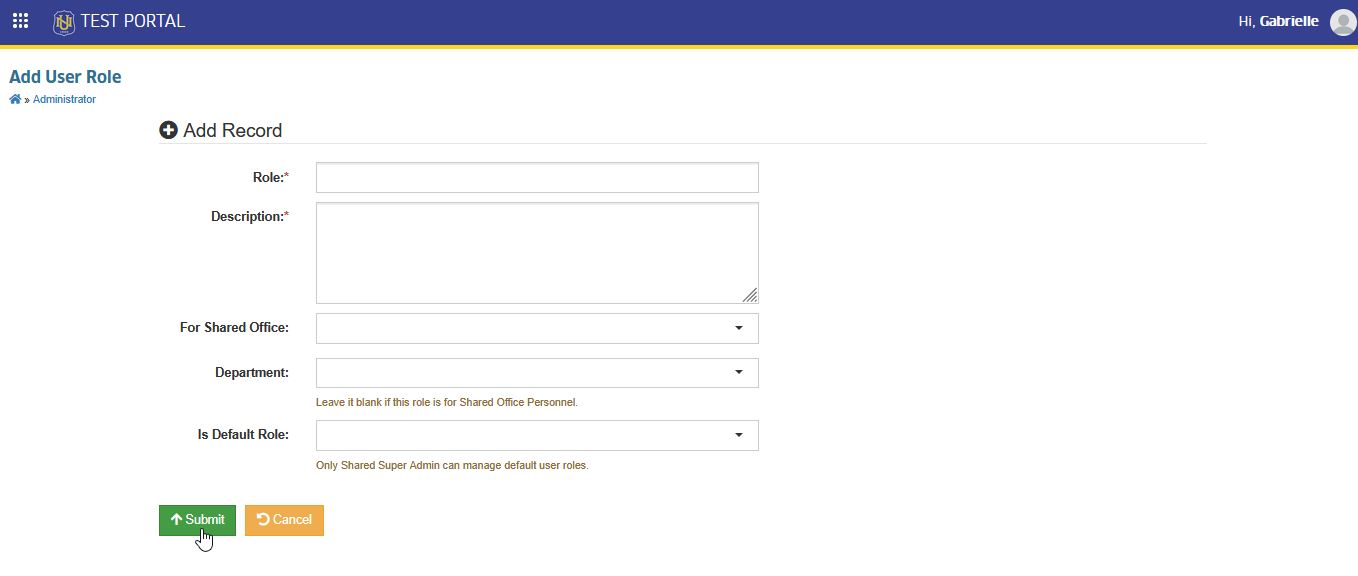
Here are the required fields when creating a new user role.
| Field Name | Description | Is Required |
|---|---|---|
| Role | The name or title of the user role you are creating. | Yes |
| Description | A short explanation of the role’s purpose or scope. | Yes |
| For Shared Office | Indicates whether the role is intended for users in shared service offices. Select Yes or No from the dropdown. | No |
| Department | The specific department where the role will be applied or assigned. | No |
| Is Default Role | Shows whether the role is a defined default role that cannot be modified by campus IT administrators. Select Yes or No from the dropdown. | No |
List of Default User Roles
See the table below to view all default roles in the system, including those for campus users and shared services users. For default roles, the campus IT Administrator cannot make any modifications.
Campus Default Roles
| Role Name | Description | NUIS Portal | NUIS-SHS Portal | |
|---|---|---|---|---|
| 1 | Super Admin | Super admin role with 100% system privileges. | ✅ | ✅ |
| 2 | System Admin | System admin role with all sysadmin permissions. | ✅ | ✅ |
| 3 | Staff | Non-Teaching Employee (ASP). | ✅ | |
| 4 | Student | students module access. | ✅ | ✅ |
| 5 | Graduating Student | Module access for students candidate for graduation. | ✅ | |
| 6 | College Teacher | Full-time or Part-time College Teacher. | ✅ | |
| 7 | College Teacher 1 | Module access for College teacher with NSTP access/ NSTP Coor. | ✅ | |
| 8 | Program Chair | Module access for Program Chairs. | ✅ | |
| 9 | Deans | Module access for Deans. | ✅ | |
| 10 | College Adviser | Module access for Enrollment Advisers. | ✅ | |
| 11 | College Adviser 1 | Module access for Enrollment Advisers with override. | ✅ | |
| 12 | College Adviser 2 | Module access for Enrollment Adviser with override/overload. | ✅ | |
| 13 | Executive Director | Module access for Executive Director. | ✅ | ✅ |
| 14 | Academic Director | Module access for Academic Director. | ✅ | ✅ |
| 15 | Administrative Director | Module access for Admin Director. | ✅ | ✅ |
| 16 | SHS, Principal | Module access for SHS Principal. | ✅ | ✅ |
| 17 | SHS, Staff | Module access for Staff/ASP under SHS. | ✅ | |
| 18 | SHS, Adviser | Module Access for SHS Class advisers/teachers/faculty. | ✅ | ✅ |
| 19 | SHS, Strand Coordinator | Module Access for SHS Strand coordinators. | ✅ | ✅ |
| 20 | ADM, Supervisor | Module access for Admissions office head. | ✅ | ✅ |
| 21 | ADM, Assistant | Module acccess for Admissions office personnel. | ✅ | ✅ |
| 22 | REG, Supervisor | Module access for Registrar Head. | ✅ | ✅ |
| 23 | REG, Assistant | Module access for Registrar personnel. | ✅ | ✅ |
| 24 | HR, Supervisor | Module access for HR Head. | ✅ | ✅ |
| 25 | HR, Assistant | Module access for Human Resource Personnel. | ✅ | ✅ |
| 26 | TO, Supervisor | Module access for head of Treasury Office. | ✅ | ✅ |
| 27 | TO, Assistant | Module access for Staff/ Assistant under Treasury office. | ✅ | ✅ |
| 28 | Accounting, Supervisor | Module access for Accounting Supervisor. | ✅ | ✅ |
| 29 | Accounting, Assistant | Module access for Accounting personnel. | ✅ | ✅ |
| 30 | SDAO, Supervisor | Module access for Student Affairs Office Head. | ✅ | ✅ |
| 31 | SDAO, Assistant | Module access for Student Development Affairs Office personnel. | ✅ | ✅ |
| 32 | GSO, Supervisor | Module access for Guidance Office Senior Supervisor. | ✅ | ✅ |
| 33 | GSO, Counselor | Module access for Guidance Councelor. | ✅ | ✅ |
| 34 | LRC, Supervisor | Module access for Librarians or Library head. | ✅ | ✅ |
| 35 | LRC, Assistant | Module access for Library personnel. | ✅ | ✅ |
| 36 | DO, Supervisor | Module access for Discipline office head. | ✅ | ✅ |
| 37 | DO, Assistant | Module access for Discipline office personnel. | ✅ | ✅ |
| 38 | Marketing, Supervisor | Module permissions for Marketing head. | ✅ | |
| 39 | Marketing, Assistant | Module access for Marketing personnel. | ✅ | |
| 40 | Physical Facilities, Supervisor | Module access for Physical Facilities Head. | ✅ | |
| 41 | Physical Facilities, Assistant | Module access for Physical Facilities personnel. | ✅ | |
| 42 | Purchasing, Supervisor | Module access for Purchasing office head. | ✅ | |
| 43 | Purchasing, Assistant | Module access for Purchasing office personnel. | ✅ | |
| 44 | Motorpool, Supervisor | Module access for Motorpool Head. | ✅ | |
| 45 | Motorpool, Assistant | Module access for Motorpool personnel. | ✅ | |
| 46 | Alumni Office, Supervisor | Module access for Alumni Office Head. | ✅ | |
| 47 | Alumni Office, Assistant | Module access for Alumni office personnel. | ✅ | |
| 48 | HSD, Supervisor | Module access for Health Services Office Head. | ✅ | ✅ |
| 49 | HSD, Nurse | Module access for Health Services Office personnel. | ✅ | ✅ |
| 50 | AIPO Supervisor | Module access for AIPO Head. | ✅ | |
| 51 | AIPO, Assistant | Module access for Academic Internship and Placement Office personnel. | ✅ | |
| 52 | ISSO, Supervisor | Module permissions for International Student Services Office head. | ✅ | |
| 53 | ISSO, Assistant | Module permissions for International Student Services Office personnel. | ✅ | |
| 54 | Asset Management, Supervisor | Module access for Asset Management Head. | ✅ | |
| 55 | Asset Management, Assistant | Module access for Asset Management personnel. | ✅ | |
| 56 | Admin Assistant | Module Access for Admin Assistants. | ✅ | |
| 57 | FSO, Coordinator | Module access for FSO Coordinator. | ✅ | ✅ |
| 58 | GenEd, Coordinator | Module access for GenEd Coordinator. | ✅ | |
| 59 | NSTP, Coordinator | Module access for NSTP Coordinator/Program Chair. | ✅ | |
| 60 | TOEIC, Coordinator | Module access for TOEIC Coordinator. | ✅ | |
| 61 | Research, Supervisor | Module access for Research Heads. | ✅ | |
| 62 | ComEx, Supervisor | Module access for Comex Heads. | ✅ | |
| 63 | ITSO, Assistant | Module access for ITSO personnel. | ✅ | ✅ |
| 64 | Laboratory, Technician | Module access for Laboratory Technician. | ✅ | ✅ |
Shared Service Roles
| Role Name | Description | NUIS Portal | NUIS-SHS Portal | |
|---|---|---|---|---|
| 1 | BDLO, Shared Director | Module access for BDLO Shared office Director | ✅ | ✅ |
| 2 | OOP, President | Module access for NU President for approval of scholarship applications. | ✅ | ✅ |
| 3 | OOP, Admin Assistant | Module access for OOP Admin Assistant for evaluation of Presidents Discount. | ✅ | ✅ |
| 4 | Executive Vice President | Module access for Executive Vice President. | ✅ | ✅ |
| 5 | Internal Audit, Shared Executive | Module access for Internal Audit Executive under Shared office. | ✅ | ✅ |
| 6 | Internal Audit, Shared | Internal Audit Team module access. | ✅ | ✅ |
| 7 | M365 Admin | Module access for M365 Administrator. | ✅ | ✅ |
| 8 | M365 Assistant Administrator | Module access for M365 Assistant Administrator. | ✅ | ✅ |
| 9 | QMO, Shared | Module access for QMO personnel. | ✅ | |
| 10 | Marketing, Shared | Module access for Marketing Shared personnel. | ✅ | ✅ |
| 11 | ADM, Shared | Module access for Admission Coordinator Shared Office. | ✅ | ✅ |
| 12 | Accounting, Shared | Module access for Accounting Shared office | ✅ | ✅ |
| 13 | Accounting, Shared 1 | Module access for Accounting personnel under shared services with access to accounting reports only. | ✅ | |
| 14 | University Registrar | Module access for University Registrar of NU Main. | ✅ | |
| 15 | HR, Shared | Module access for HR Shared office to access the faculty SPES module. | ✅ | |
| 16 | Alumni Office, Shared Assistant Director | Module access for Alumni Office Assistant Director under Shared Services. | ✅ | |
| 17 | FSO, Shared | Module access for FSO Director, Shared Services. | ✅ | ✅ |
How to Use the Module
Provides step-by-step instructions on navigating and performing tasks within the User Role module, such as creating, editing, deleting, and viewing roles, as well as assigning the appropriate permissions to each role.
Create New Role
Follow the steps below on how to create new role.
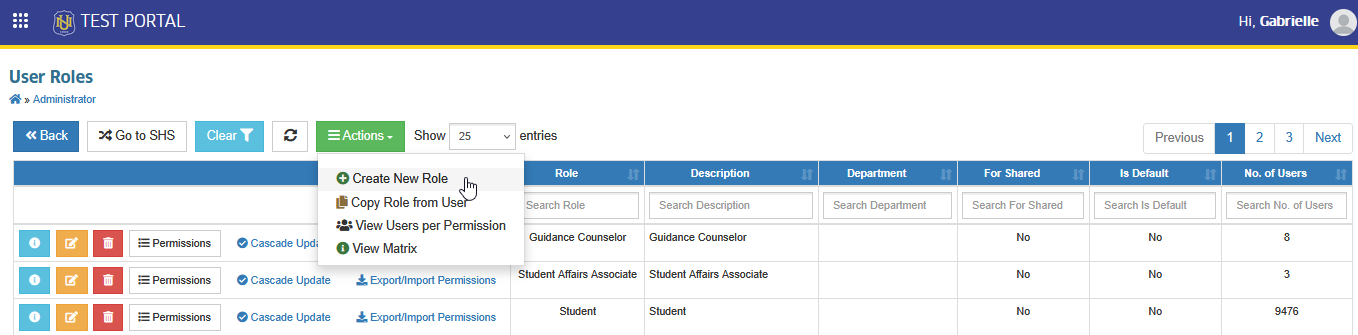
STEP 1. In User Roles page, click the button and select the from the dropdown list. User will be redirected to Add User Role page.
STEP 2. In Add User Role page, enter the user role details on the required field. Refer to the Field Description section for mor information about each field.
STEP 3. Click button to save the new user role record.
User role has been successfully added.
Manage user's permissions by importing user role file or manage it manually in this module.
Manage Permissions
This section allows you to assign specific passports (permissions) to the role. You can either manually enable the permissions by selecting them from the list or quickly apply a set of permissions by importing a JSON file.
Manage Permission Manually
Follow the steps below on how to manually assign permissions.
STEP 1. In Edit User Role page, click the button. This will redirect to Role Permissions page.
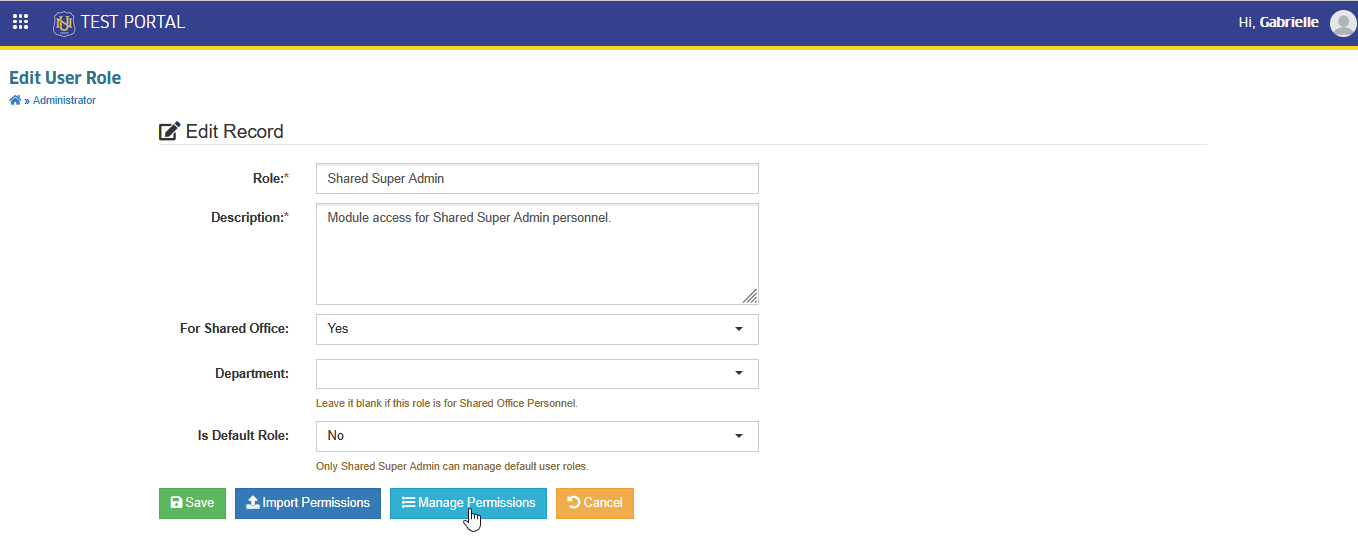
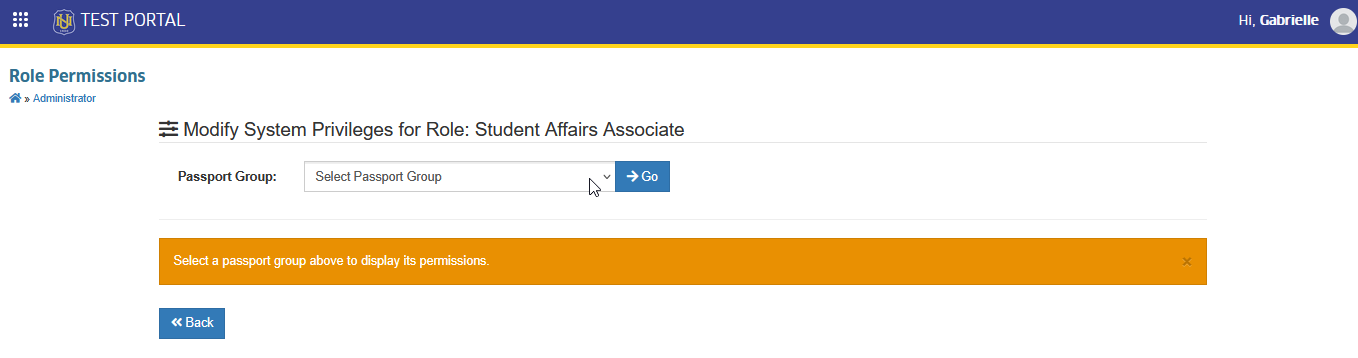
STEP 2. In Role Permissions page, select the passport group in Passport Group field to display its permissions.
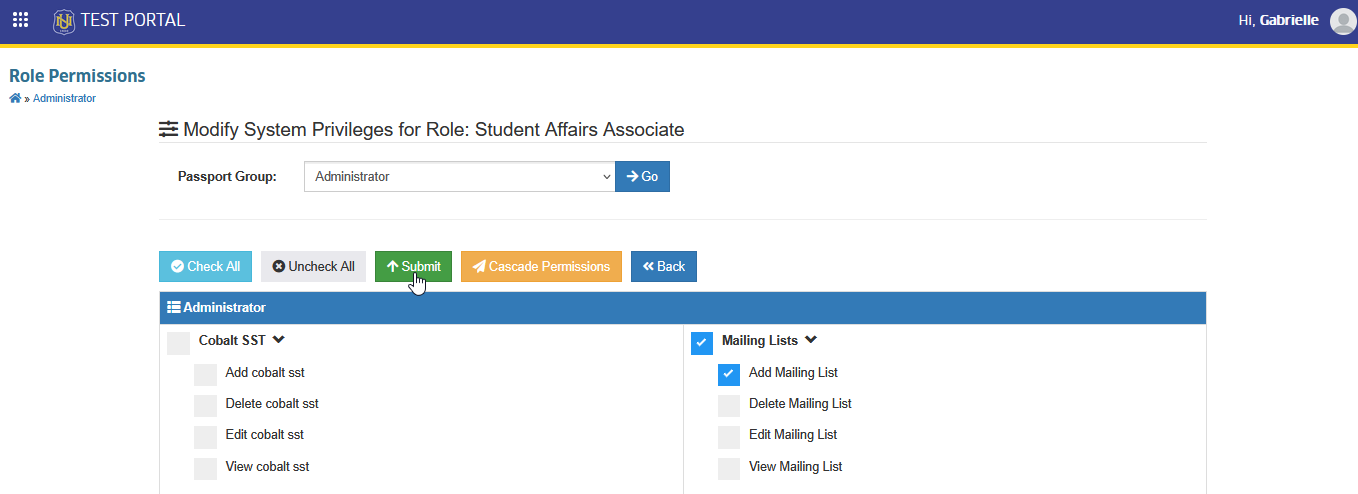
STEP 3. Enable the permission by clicking its checkbox. Once you have finished adding permissions in a specific group, click the button to save the changes.
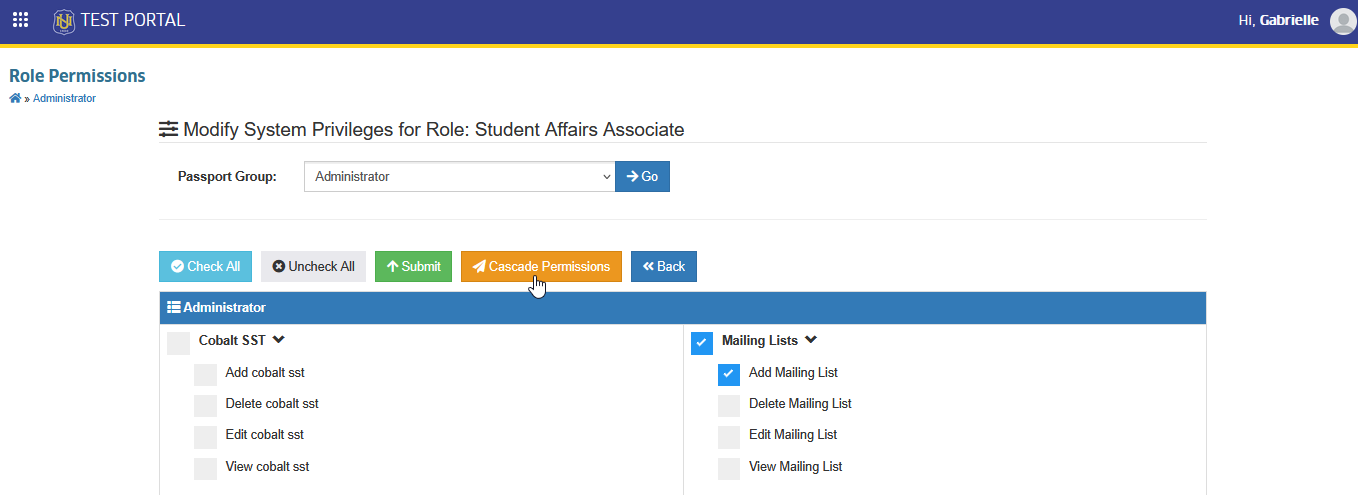
STEP 4. Click the button to apply the changes to all users assigned to the user role.
Import Permission's JSON File
Follow the steps below to manage permissions using the module's Import JSON file feature. This option allows your to quickly assign a predefined set of permissions to a role by uploading a JSON file.
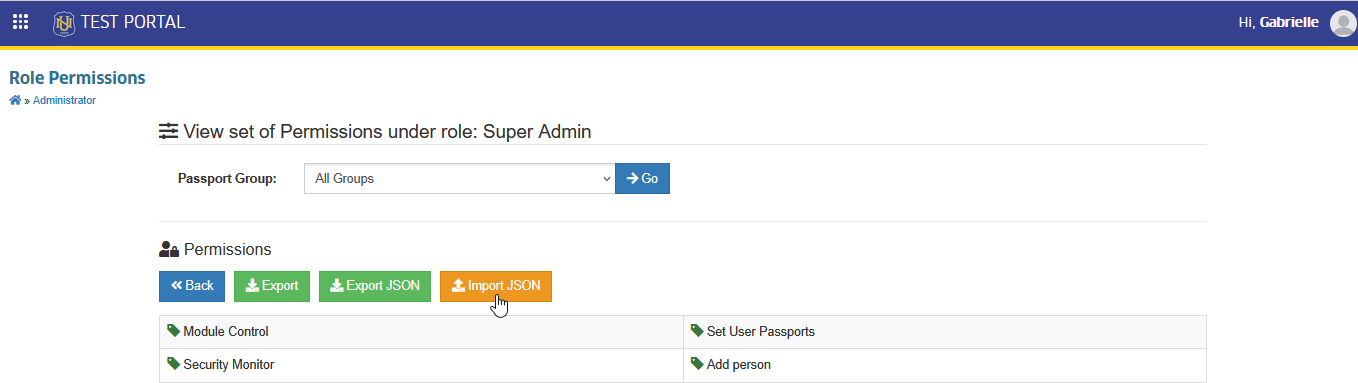
STEP 1. In Edit User Role page, click the button. This will redirect to Role Permissions page.
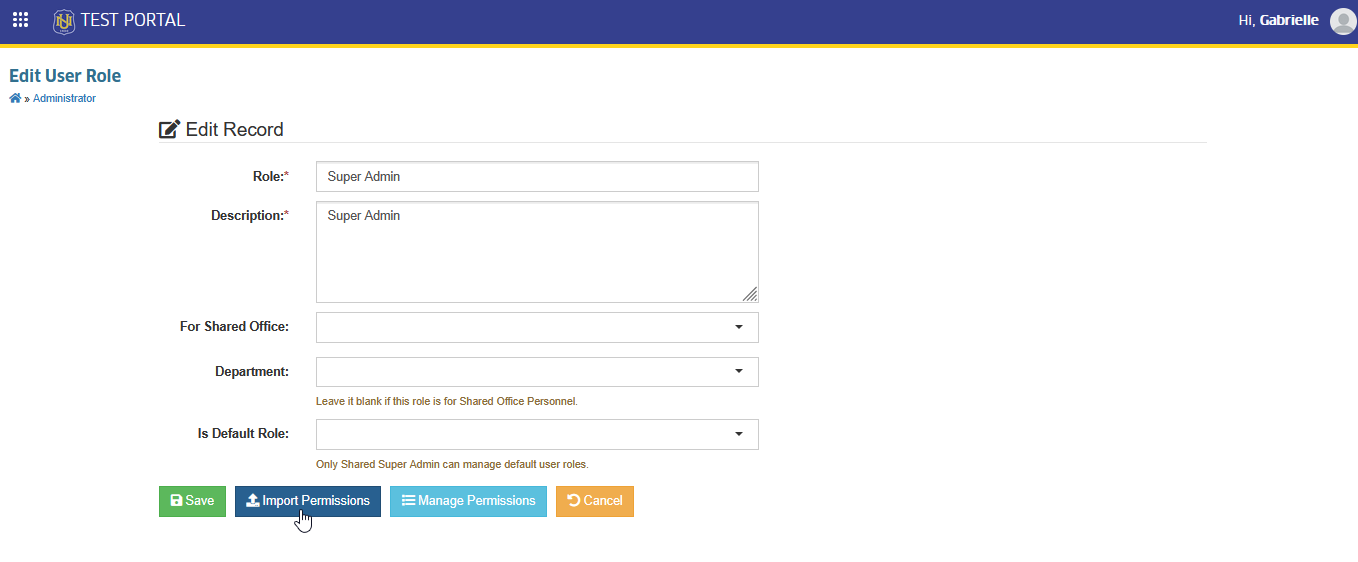
STEP 2. In Role Permissions page, click the button. The Import Data From File prompt will appear.
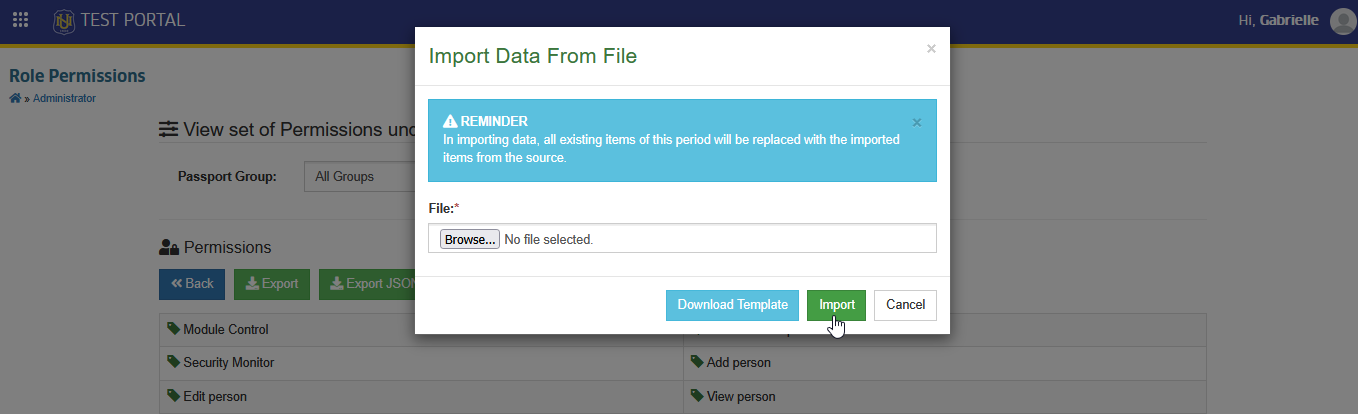
STEP 3. Select the JSON file from your device, then click the button.
Copy Role from User
This feature allows you to create a new role by copying the permissions of an existing user. It provides a quick way to set up a role without manually selecting permissions, ensuring consistency with the user’s current access rights.
Follow the steps below on how to create new role from user.
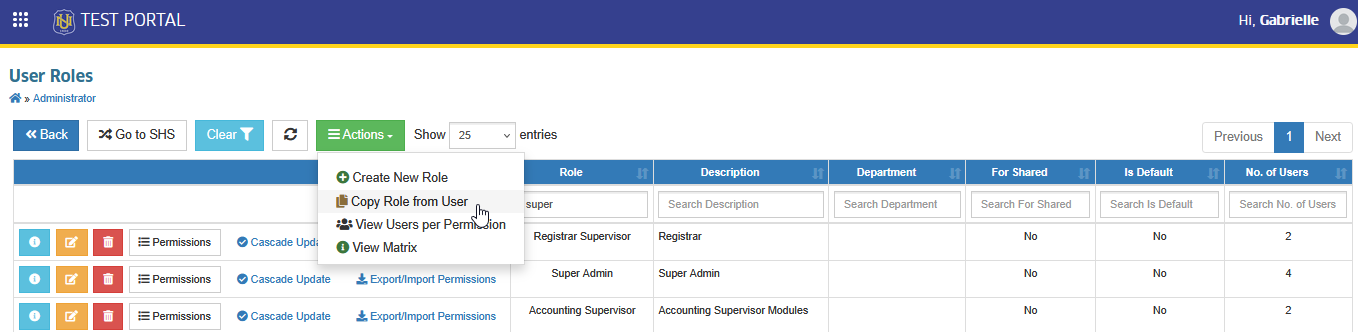
STEP 1. In User Roles page, click the button and select the from the dropdown list. User will be redirected to Add User Role based on User page.
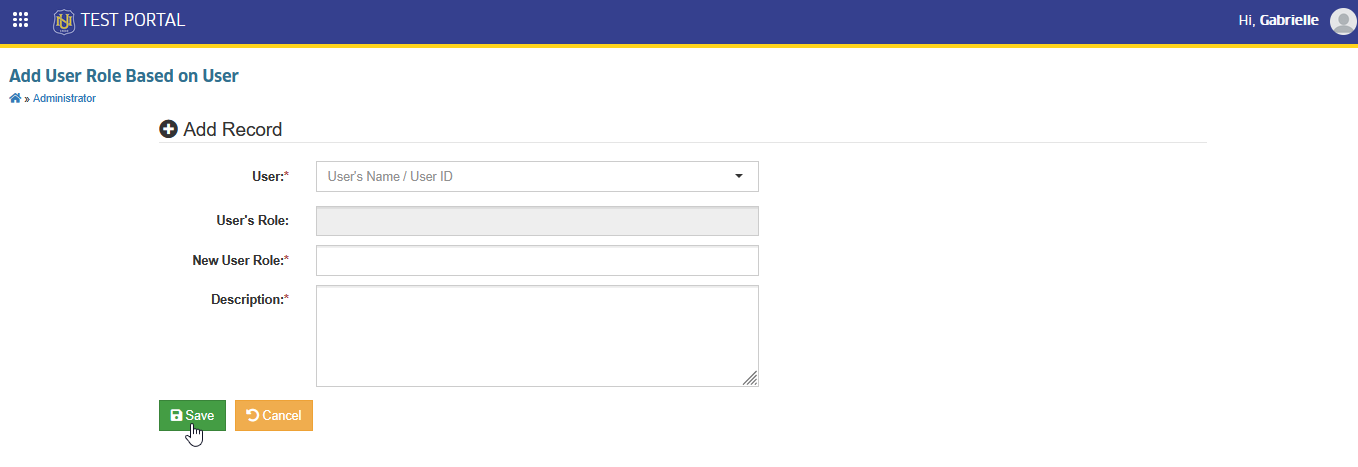
STEP 2. On the Add User Role based on User page, enter the user's ID or Username. Provide the new role name and its description, then click the button to create new role wiht th same permissions as the selected user.
STEP 3. Manage or add permissions manually. Follow the instructions in Manage Permissions for details on how to manually add permissions.
Editing an Existing Role
This feature allows you to update the details and permissions of a current user role. You can change the role name, description, assigned passports (permissions), or other applicable settings to keep the role aligned with updated responsibilities and access requirements.
Follow the instructions below on how to edit an existing role.
STEP 1. In User Role page, under the actions column, click the button corresponding to the role you want to modify. You will be redirected to Edit User Role page.
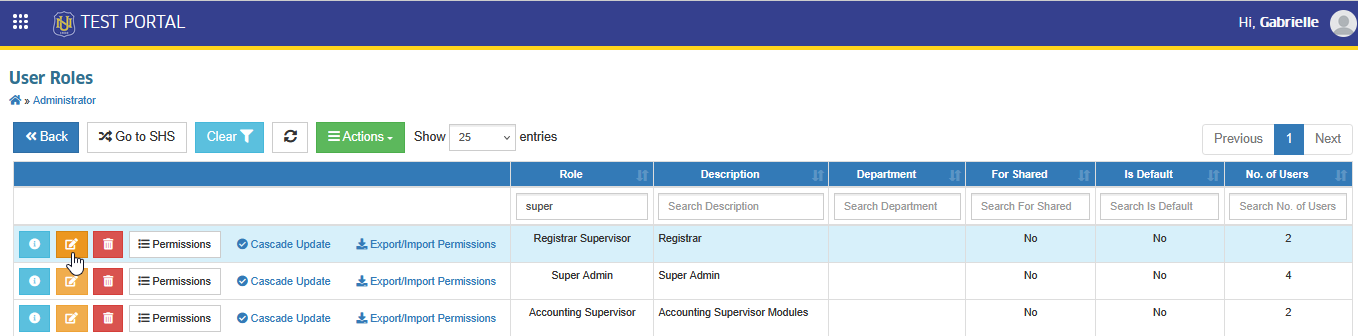
STEP 2. In Edit User Role page, update the user role details as needed.
STEP 3. Click the button to apply and save the changes.
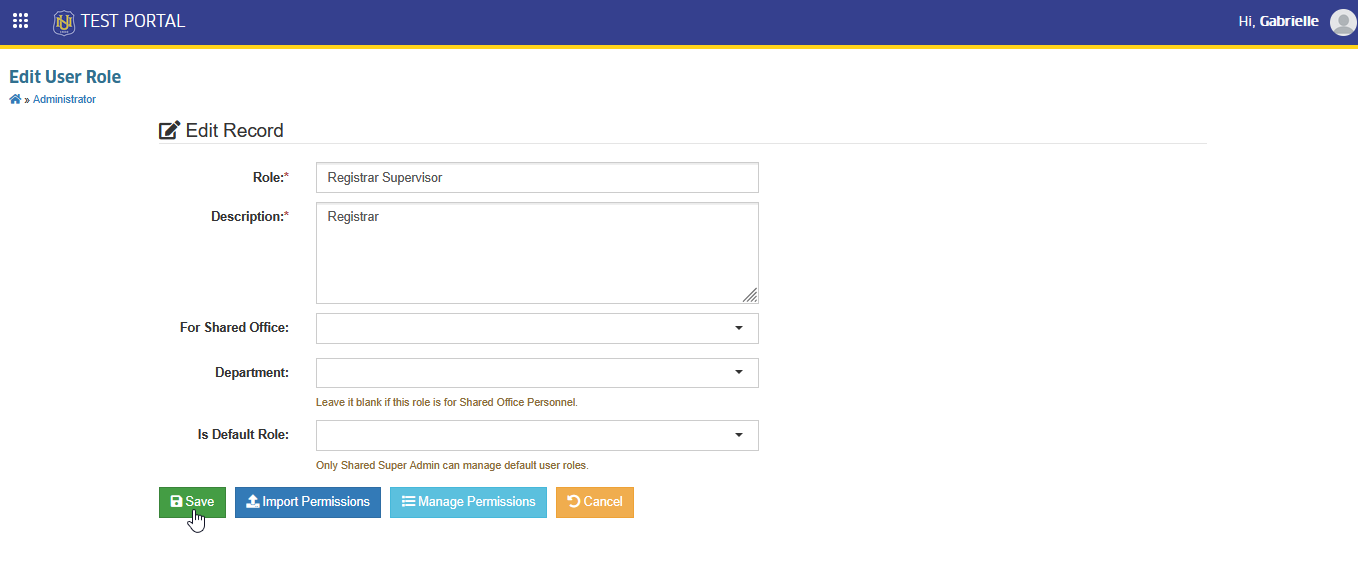
User role has been successfully updated.
Manage user's permissions by importing user role file or manage it manually in this module.
If only the permissions need to be updated, click the corresponding button in the actions column of the user role.
Delete User Role
This feature allows you to remove an existing user role from the system. A role can only be deleted if there are no users currently assigned to it, ensuring that no active accounts lose their required permissions unexpectedly.
Follow the instructions below on how to delete a user role.
STEP 1. On the User Role page, in actions column, click the button for the role you want to delete. You will be redirected to Delete User Role page.
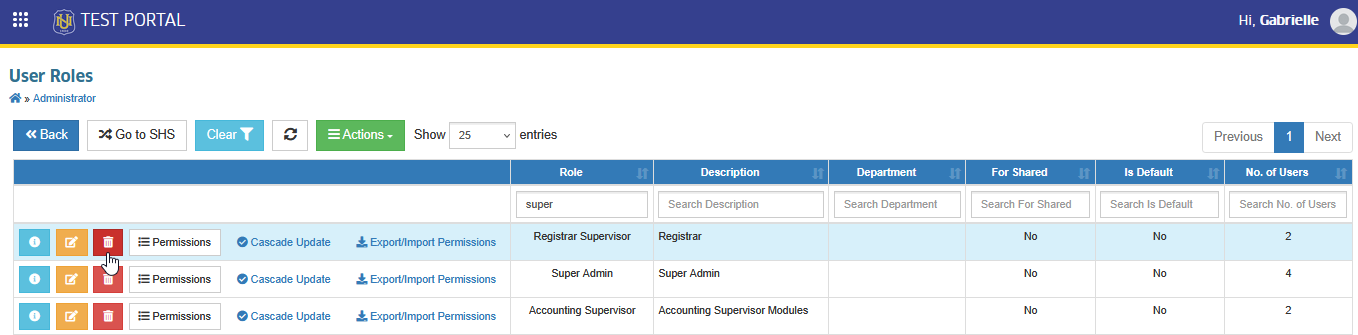
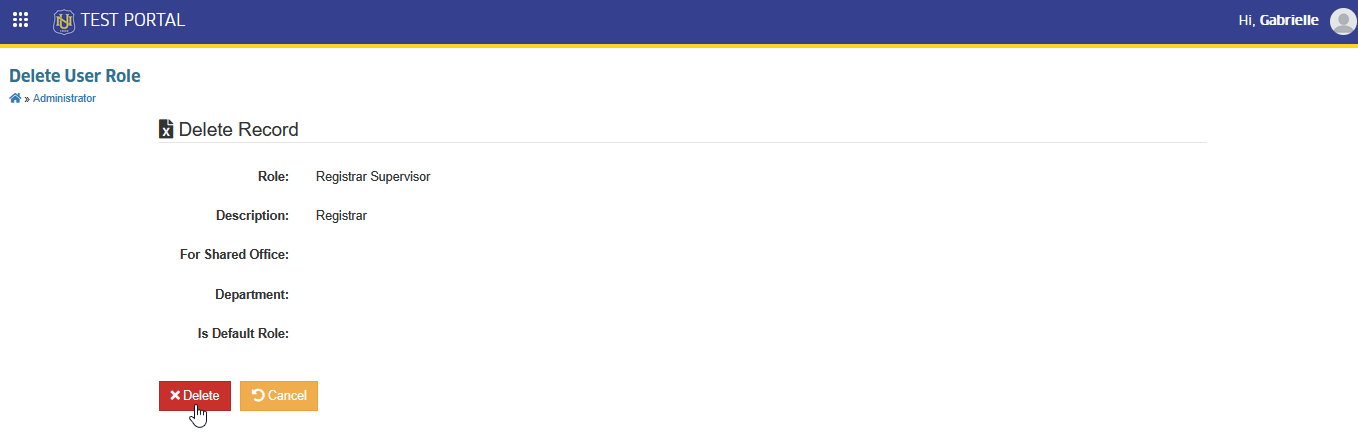
STEP 2. On the Delete User Role page, remove the role by clicking the button.
View Users per Permission
This feature allows you to see a list of all users who have a specific permission (passport) in the system. It helps administrators track permission assignments and ensure the right users have the correct access.
Follow the instruction on how to use this feature.
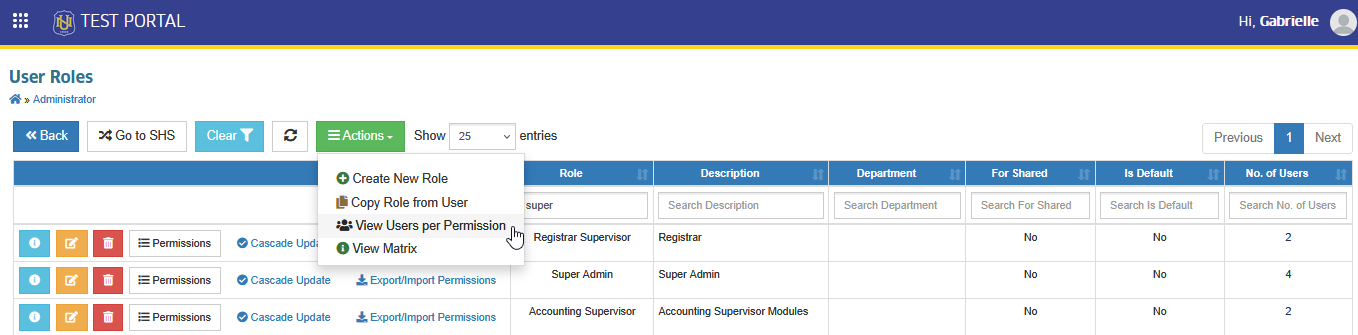
STEP 1. In User Roles page, click the button and select the from the dropdown list. User will be redirected to View Users per Permission page.
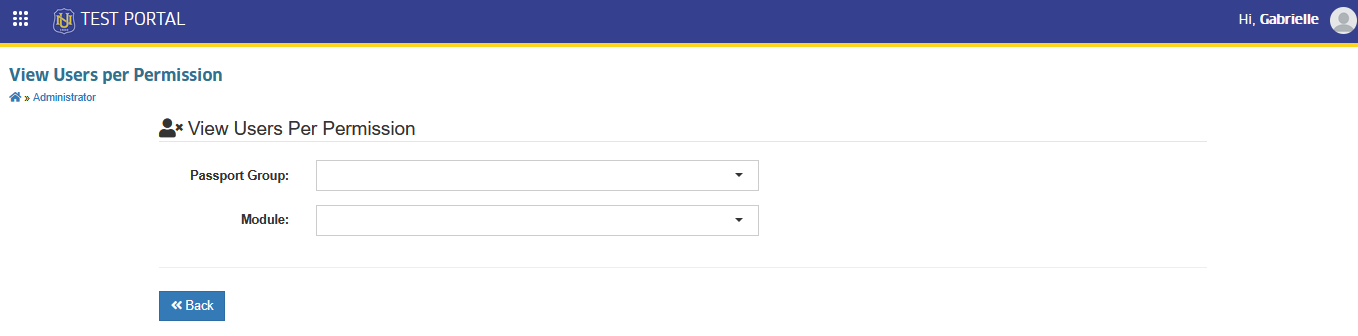
STEP 2. Specify the Passport Group and Module name from the dropdown list to view users with the specified permission.
You may download an offline backup of the record by clicking the and button.
How to update permissions of all users under same role?
This section explains the process of applying updated permissions to every user assigned to a specific role. By cascading the permissions, any changes made to the role’s access rights will automatically reflect on all users linked to that role.
Follow the instruction below on how to cascade permissions.
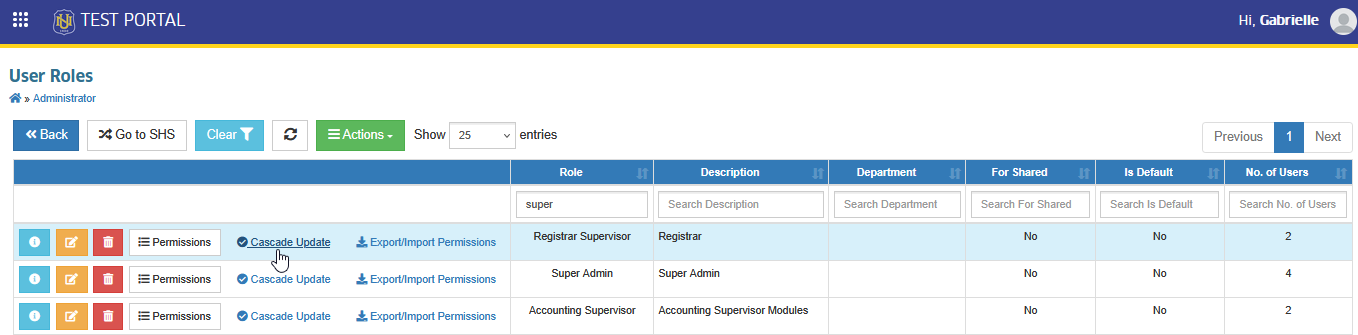
STEP 1. In User Role page, under actions column click the button. You will be redirected to Role Cascade Update page.
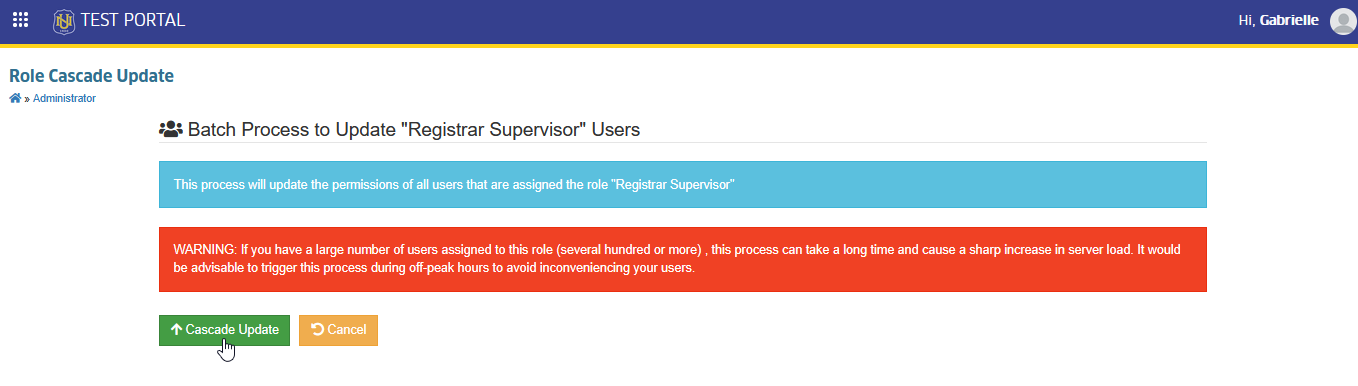
STEP 2. In Role Cascade Update page, click button. Wait for the cascade update to finish.
How to export user role?
This section explains how to download the JSON file containing the permissions (passports) of a specific user role. Exporting the JSON file allows you to back up the role’s permissions or import them into another role when needed.
Follow the instructions below on how to export user role's JSON file.
STEP 1. In User Role page, under actions column click the button. You will be redirected to Role Permissions page.
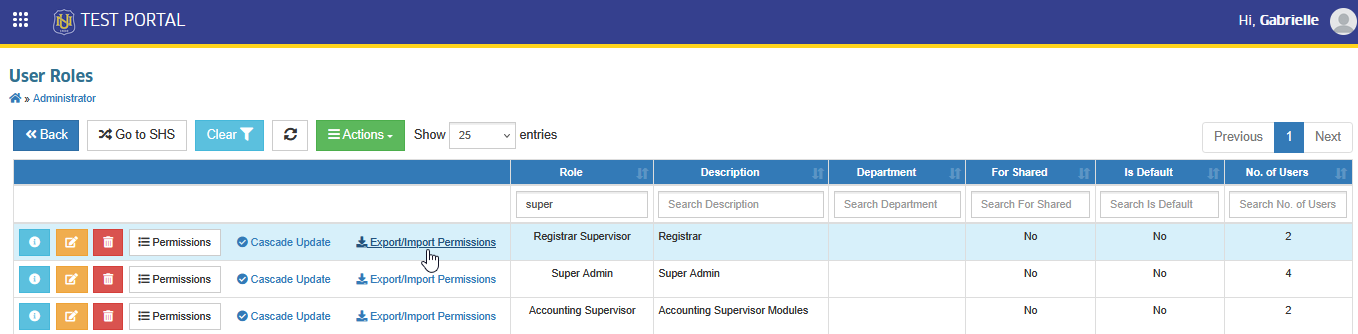
STEP 2. Click button if you want to download the JSON file of the user roles permission.
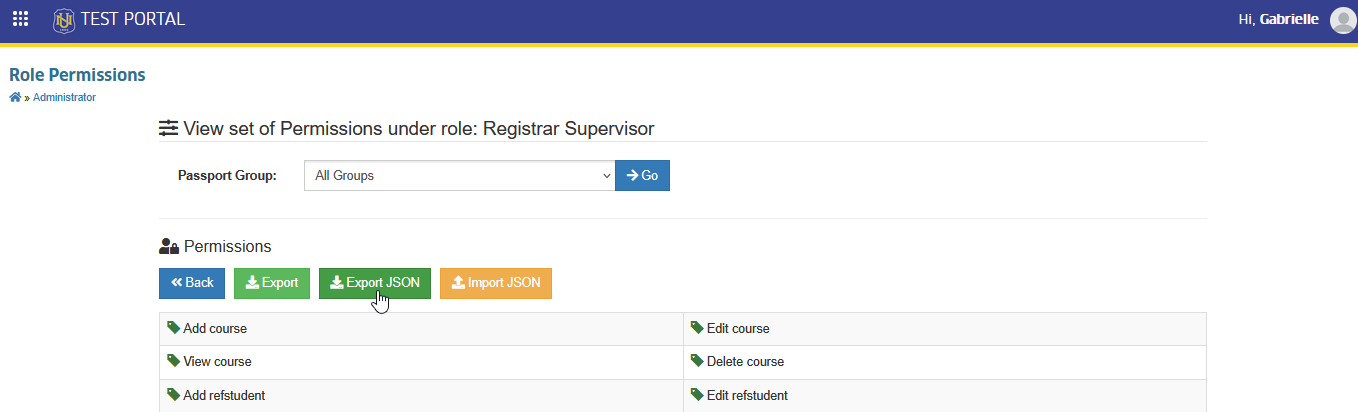
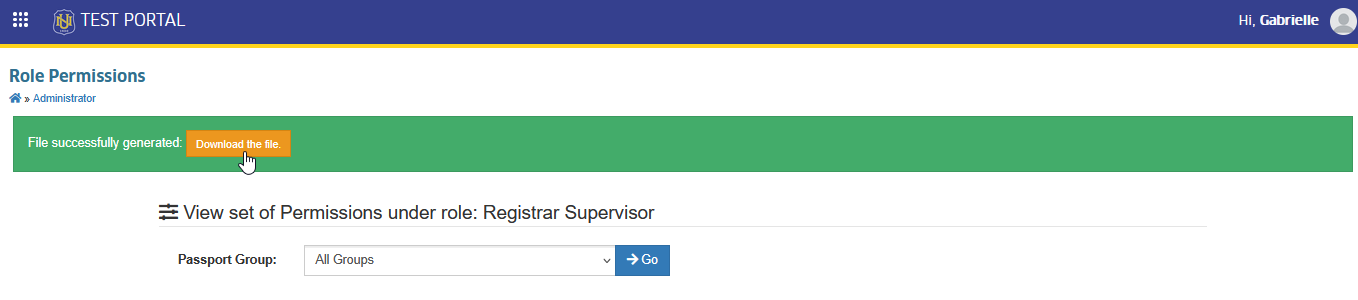
STEP 3. Click the button to download the JSON file of the user role.
View Matrix
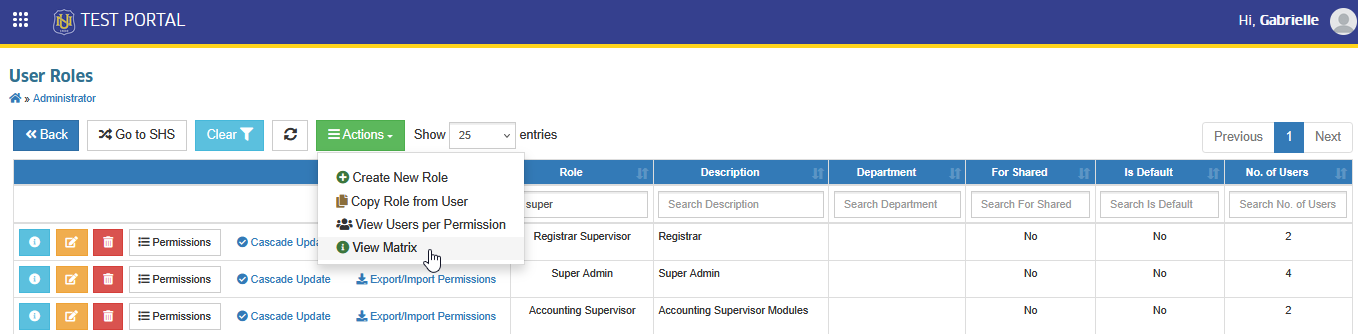
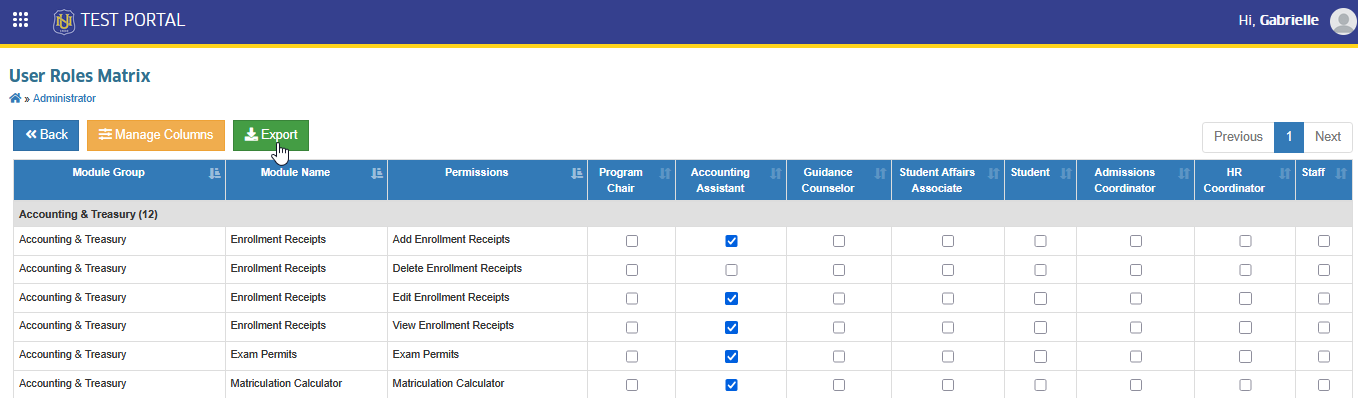
This feature displays a table showing all user roles and their corresponding permissions (passports) in a single view. It provides an overview of which permissions are assigned to each role, making it easier to review and manage role-based access.
STEP 1. In User Roles page, click the button and select the from the dropdown list. User will be redirected to User Roles Matrix page.
STEP 2. In User Roles Matrix page, All user roles with its corresponding permissions in the campus onlineapp will be displayed. Administrator can generate report and dowload it by clicking the button in the page.
-
All shared service user roles cannot be modified by campus IT Administrators.
-
Only Shared Super Admin can manage default user roles.
-
Campus IT Administrators cannot create default user roles.
-
Do not forget to cascade permissions after modifying the permissions of specific user role.
-
After cascading the permissions, advise the user to refresh their access to see the changes.
For more questions or concerns, email us at nu-desk@national-u.edu.ph